
About this document
The Framsticks Tutorial provides a step-by-step introduction to Framsticks. It covers basic issues related to program interface, simulation, genetics, and evolution. The tutorial also refers to a few more advanced functions, including writing user procedures, neuron types, etc. This tutorial can be used during Framsticks classes, and for self-education as well. It requires the Framsticks GUI installed on an MS Windows operating system. For Linux and macOS, use the same application running under Wine.
If you are a teacher, take some time to go through all steps and do the exercises. We recommend quickly reading through the Framsticks Manual first. You may want to skip some parts of the tutorial during the class, depending on your discipline. For example, you may focus on simulation, genetics, evolution, interactions, or script programming. Computer science, robotics, biology, cognitive science or philosophy requires emphasis on different sections. It is a good idea to first estimate the time needed for students to perform the tasks. You might also enumerate the concepts that students should be able to learn (or be able to test) after they have completed this tutorial. You may ask students to prepare a written report (or oral presentation) based on selected exercises.
If you are a student or want to go through this tutorial to learn Framsticks, we recommend that you first browse briefly through the Framsticks Manual. Then start with the tutorial. It is a good idea to ask somebody else (a friend) to independently do these exercises as well, and later discuss them together and exchange ideas. If some parts are too difficult, you may skip them, and later go through the tutorial again. Refer to the web pages or the Manual if you miss some information.
Every year, the authors and longtime users of this software run classes, courses and workshops based on this tutorial. Depending on the level of detail covered and how far we advance, these courses last from 2×1.5h to 8×1.5h. Short 1×1.5h presentations and very detailed, advanced 10×1.5h courses are also possible. If you live near Poznan, Poland, you may be interested in the meetings and presentations in the Artificial Life Lab. Or you may request online consultations.
The full documentation is available on the official web site (which is the best place to get information) and is summarized in the Framsticks Manual. This tutorial is not a substitute for the documentation. If you have completed this tutorial earlier or want to learn about evolution through slightly more challenging experiments in Python, have a look here.
The video walkthrough playlist is available here.
- Basics
- Meet Framsticks
Goal: see a few Framsticks creatures, their behavior, physical properties, interactions, etc.
Setting: use the Framsticks GUI for Windows. Go to menu: and setExperiment › Populations › Creatures: Deathto "off". This presentation can also be performed using the "Framsticks Theater" app (or Demos in the "Artificial Life" app) and the "presentation" show.- Load "walking.gen" and start the simulation
- Simulate some interesting creatures: quadruped, lizard, hopping spider, etc. (right click on the genotype → Simulate → Creatures)
- Basic user interface tasks:
- left mouse button drag: rotate camera
- right mouse button drag: pan
- left double click: zoom on creature
- wheel up/down: zoom
- control + left click: grab creature ("manipulator")
- shift + right click: select action
- right double click: feed (perform first action)
- Framsticks GUI
Goal: get to know the Framsticks GUI and basic concepts of the Framsticks simulator
- In menu: , some parameters should be modified while playing with creatures:
- Experiment › Populations › Creatures: Death– should be off. Otherwise creatures could die unexpectedly.
- Experiment › Parameters: Simulated creatures– the simulator will spawn that many creatures automatically. Set this to 0 if you don't want the simulator to interfere with your creatures
- A genotype is the description (building plan) of a creature. Can be saved in a file. (menu: )
- Body&Brain Window (located by default at the top right): click on a genotype (on the genotypes list) to see the physical structure and neuron connections. Click on a creature (on the populations list) to see its live neural connections when the simulation is running.
- World Window: see the listbox in the top right corner. Compare how "Every, 25 fps", "Every" and "1:100" influence simulation speed ("simulation steps/sec." in the top right corner of the main toolbar).
- Creature: can be built from genotype
(GUI: right click on the genotype → Simulate → Creatures)
(GUI: right click on the creature → Simulate → Kill/Delete) - Mechanical simulation: can be MechaStick or ODE (rigid bodies). See the World: Simulation enginesetting. Try both engines, use the manipulator to play with creature bodies and note differences, in particular differences in collision detection between bodies. For the ODE simulator, try also some genotypes loaded from the
solid-shapes.genfile.
- In menu: , some parameters should be modified while playing with creatures:
- Learn genetics
Goal: learn how to design a simple structure in the f1 encoding
- Click New to create a new genotype
- Enter the genotype and watch the results in the body preview window
(See also the f1 genotype specification)- Enter X – a single line segment (stick) appears
- Enter a few more X's and move the cursor along the genotype. The structure view will highlight the corresponding body element. Click on the sticks to have the corresponding genotype part underlined. You can select a larger part of the genotype (more characters) and also select many parts of body or brain (click with the SHIFT key pressed).
- Branching: use parentheses (...) and commas to create tree-like structures. Example: XXX(XX,X). See how the additional commas influence the branching direction: XXX(,,,XX,X)
- Parentheses can be nested, try: XXX(XX,X(X,X)) (go through the genotype with the cursor to make sure you know which stick is created from each X)
- Rotate the branching plane: introduce the R/r modifiers. Insert R's one by one and watch the resulting structure: XXX(XX,RRRX(X,X))
- More shape modifiers: Q C L – insert into the genotype and guess how they work. See f1 encoding for explanation. Note the general rule: lowercase/uppercase letters have the opposite meaning.
- Note the small icon at the bottom right corner of the Body view panel. Drag it left and right to see developmental phases of the phenotype.
- Note that a red background means that the genotype is invalid – like "X[", and a pink background means a genotype error which can be corrected automatically – like "X()". Some genotypes are valid in syntax, but problems arise during building creatures. Try for example the "X[|][|]" genotype, which has two identical muscles in the same place in the body. As this is invalid, an additional entry will appear ("Build problems encountered!") in the small arrow menu in both panels displaying body and brain. Click it to see the list of build problems.
- Exercise 1: Guess the genotype from the creature's shape:
Solution: ask the tutor.Exercise 2: Can you write another genotype resulting in the same shape?
- Exercise 3: Build an interesting shape using this genetic language.
- Click New to create a new genotype
- Conclusion: Limitations of this 'f1' genotype encoding
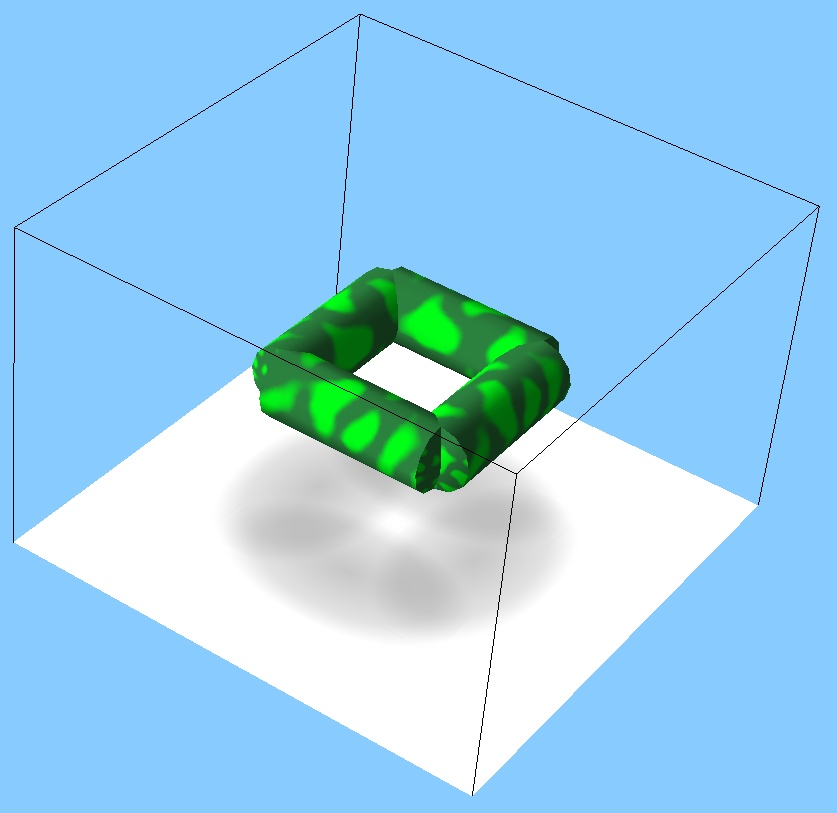
- Only tree-like structures: closed loops are not possible (although you can build an open-loop square easily – try to do it, and then simulate it using MechaStick and ODE simulators, jiggle it with the manipulator hand and spot the difference).
- The stem and its branches are always placed on the same plane – the following shape is not possible:
- Only tree-like structures: closed loops are not possible (although you can build an open-loop square easily – try to do it, and then simulate it using MechaStick and ODE simulators, jiggle it with the manipulator hand and spot the difference).
- Neurons
Goal: add neurons (effectors, receptors) to the creature
- Neural net description is mixed with the body genotype, like this: X[1:2]X[-1:3,0:1]X
Each entity enclosed in square brackets is a single neuron. Commas delimit inputs (connections) of the neuron. In each connection, the number before ":" is the relative neuron reference (0=self-connection, +1=next neuron in the genotype, −1=previous one). The other number (after ":") is the connection weight. In the example above, no neuron type name has been specified, thus the default "N" neuron is assumed. See the following examples and ensure you understand them well. Enter them as genotypes into the program:
- cccXXXXX[0:0][-1:1][-1:1][-1:1][-1:1] (Chain of neurons)
- cccX[0:0]X[-1:1]X[-1:1]X[-1:1]X[-1:1] (Different neuron placement in the body)
- cccX[4:1]X[-1:1]X[-1:1]X[-1:1]X[-1:1] (Closed the loop)
- cccXXXXX[0:0][0:0]X[0:0]X[0:0]X[-1:1,-2:1,-3:1,-4:1] (Multiple inputs)
- There are many different neuron types, see menu: "Genetics/Neurons to add" for a quick summary. Examples:
- X[Sin,f0:0.1]
– "Sin" is a neuron type (Sinus generator)
– "f0" is the property of the Sin neuron – a base frequency for the sinus generator, default value 2π/100 - X[T][G][S][-3:1,-2:1,-1:1] – 3 receptors connected to a single neuron
- XX[T][-1:1][|,-1:1] – receptor (touch sensor) → neuron → effector (muscle)
- X[Sin,f0:0.1]
- See interactive demonstrations of basic sensor and effector neurons.
- You can have a look at the f1 encoding reference.
- Neural net description is mixed with the body genotype, like this: X[1:2]X[-1:3,0:1]X
- Brain control
Goal: monitor and control "living" neurons
- Start with this structure: X(X,XXRRX(X,X,,),X)
- Adjust length of limbs: X(X,lllXRRlllXlllX(lX,lX,,),X)
- Add two muscle neurons. The "p" property (muscle power) in one muscle is set to maximum (1):
X(X,lllX[|]RRlllXlllX[|,p:1](lX,lX,,),X) - Make sure that in menu: , the following values are set:
- Experiment/Populations/Creatures: Death is disabled
- Experiment/Populations/Creatures: Neural net simulation is "Immediate"
- Experiment/Populations/Creatures: Performance calculation is "Immediate"
- Experiment/Parameters: Simulated creatures is set to 0
 Build a creature from this genotype (right click on the genotype, Simulate → Creatures) and start the simulation (menu: ). The creature appears in the world and on the populations list.
- Select the creature by clicking on the populations list. This will associate the Body&Brain window (located by default at the top right) with the living creature (and not with the genotype) and zoom the camera on it.
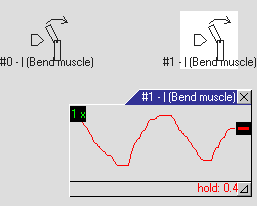
- Double-click on the neuron #1 in the Body&Brain window (on the neural net diagram).
- The tiny window inside the diagram is a probe. It can be used to display and change the signal. Drag the thick black handle up and down. You can see the immediate muscle response – the creature moves. Try to find the best signal pattern to make the creature go forward.
- Add the velocity column to the populations list (if not already present): right click on the populations list → "Show columns" → "Recent period velocity". Now you can read the current velocity while controlling the creature.
- Click the red hold label to release the neuron output.
- Brainbuilding
Goal: make the creature move on its own
We will use the "Sin" neuron (sinus generator) to obtain the muscle control pattern.
-
Connect the new Sin neuron:
X[*][N][Sin,f0:0.1,-1:0.2][N,-1:1,-3:-0.5](X,lllX[|]RRlllXlllX[|,-2:-0.5,p:1](lX,lX,,),X)- Explanation:
- [Sin,f0:0.1] is the sinus generator with the default output frequency of 0.1. This frequency is also influenced by inputs.
- -2:-0.5 means "connect to the second previous neuron, weight -0.5"
- [*] is a neuron which produces a constant value of one (1).
- Build the creature and select it on the list. The creature moves!
- This time two probes will show the signal for the sinus input and for the muscle input. Add the first probe to the neuron in front of the muscle. Click and hold the left mouse button on the 1 x label and drag to the right. This will increase the time range of the displayed signal, making it more readable.
- Add the second probe to the neuron in front of the Sin generator. Move the handle up and down slowly. This way you can control the frequency of the generator, because the Sin generator changes its frequency according to the input signal. Observe the first probe.
- Exercise 1: Set Experiment/Populations/Creatures: Performance sampling period = 1000. Revive the creature. Experimentally find the optimal (resulting in the highest velocity) control signal pattern. You can change both the generator frequency and the constant value (the second input for the neuron in front of the muscle). In the small drop-down list in the upper right corner of the World window you can speed up the simulation (e.g. set "1:3") so that you don't have to wait long for the speed value to update each 1000 simulation steps. Write down (for further comparisons) the best velocity you achieved.
- Add another probe to the other muscle. Try to make the creature turn left or right by changing the signal.
-
Exercise 2: Make a creature that can turn towards food. You can start with this genotype:
X[*][Sin][N,-1:44,-2:3](X[S],,lllllX[|,3:1]RRlllllXlllllX[|,-3:-0.5,p:1](lX,lX,,),,X[S][N,-1:0,-4:0])The new [S] receptors, placed on two sides of the creature, will provide different signal values when the food is close to either side of the creature. Can you use this information to set up the proper weights in the controlling (middle on the picture) neuron? Try to adjust weights so that the creature does not turn over when it turns! - Exercise 3: Our previous creature was not particularly stable when it was turning. Add two smell sensors to the Back Crawler from
walking.gento create a perfect food finder! - Exercise 4: Take the Right Angler from
walking.genand see how its speed depends on the frequency of the sinus generator. Then, using the "Energy" sensory neuron, make this creature move fast when it has a lot of energy, and slow down gradually until it dies. Subsequently implement the opposite behavior.
-
Connect the new Sin neuron:
- Communication
- Disable energy calculation or death, set Experiment/Populations/Creatures: Neural net simulation to "Immediate".
- Build the following creature (name it Sender): X[Sin][Light,-1:1] and examine its behavior.
As the name suggests, Light is the light-emitting effector. Connecting it to a sine generator creates a periodically flashing device (for positive values of sinus). Note the grid of squares appearing while the light is on – that's the way Framsticks visualizes signal strength. - Add more Senders.
- Try controlling the Light effector using a neural probe.
- Now let's design the other end – the Receiver: XX[SeeLight][|,-1:1]
Add several Receiver creatures and examine their reaction to light signals. - Delete all creatures, leaving only one Sender, and add the following genotype (called Feedback):
X(X,X[*][SeeLight][Light,-1:1,-2:-0.5])
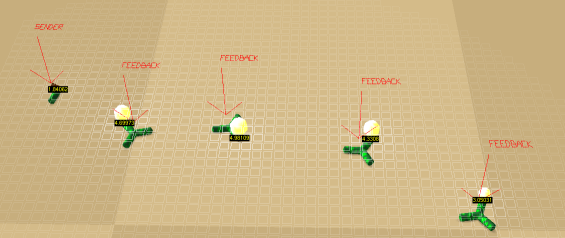 Place several Feedback creatures and one Sender, forming a line. Each Feedback reacts to incoming light by turning on its own light emitter, but only above a certain activation threshold (depending on the input weight of the * neuron). The whole chain of creatures acts like a light conductor, passing the signal between creatures.
Note: You may need to carefully adjust the distance between Feedback creatures – bring them closer if there is no reaction, increase distance if their mutual influence is too big. - Make the light signal propagate more slowly. How could this be achieved?
- Is it possible to make a circle of Feedback agents conducting light around forever (using Sender only initially to spark the light)?
- Can you make a cockroach (a creature that avoids light and looks for food when it's dark)?
- See the Fireflies show (in the "Framsticks Theater" app or Demos in the "Artificial Life" app). Experiment with the basic Firefly genotype in the Framsticks GUI:
X[SeeLight] [*] [-1:2.26,6:-2,in:0.01,fo:0.01,si:1] [*] [-2:1,-1:-0.5,si:9999,fo:1,in:0] [*] [-2:2,-6:0.3,-1:-0.4,in:0.01,fo:0.01,si:1] [*] [-2:1,-1:-0.5,si:9999,fo:1,in:0] [Light,-1:-1]
- Imagine evolution of fireflies. Our goal would be to get creatures that synchronize their flashing despite random starting conditions. How would you define the fitness function? How would a creature be evaluated?
- Read the
light.neuroandseelight.neurofiles – they implement simple communication neurons we used in this section. Adding more communication channels is as easy as copying these files. See also the Scripting section below. - See the Boids show (in the "Framsticks Theater" app or Demos in the "Artificial Life" app) or Boids expdef (in Framsticks GUI) for more sophisticated inter-creature communication involving scripting.
- A concise description of communication features is also available in the Framsticks chapter of the book Artificial Life Models in Software.
- Evolution
- Evolutionary Optimization
Goal: let evolution improve your creatures
In the previous exercises, we tried to make fast moving creatures by hand. Let's see how the evolutionary algorithm in Framsticks can be used for this purpose.
- Delete all genotypes and creatures (or restart Framsticks if you previously changed a lot)
- Add the following genotype:
X[*][Sin][N,-1:1,-2:1](X,lllX[|]RRlllXlllX[|,-2:-0.5,p:1](lX,lX,,),X)(this genotype is a simplified version of the one we used previously: the input of the Sin generator has been removed) - Set the following values in menu: :
- Experiment/Populations/Creatures: Death: enabled
- Experiment/Populations/Creatures: Neural net simulation: "After stabilization" (and the same setting for Performance calculation)
- Experiment/Populations/Creatures: Performance sampling period: 1000
- Experiment/Parameters: Gene pool capacity: 20
- Experiment/Parameters: Simulated creatures: 1
- Experiment/Parameters/Selection: Crossed over: 0 (why don't we want crossing over?)
- Experiment/Parameters/Fitness: Velocity: 1 (all others: 0)
- Genetics/f1/Morphology: All set to 0 (we don't want to mutate the body)
- Genetics/f1/Neuron net: Add/remove neuron and Add/remove neural connection set to 0, all others: 1.
- Learn how to save and load files. Using menu: , save genotypes (for example under the name
my_genotypes.gen), parameters (for example under the namemy_params.sim) and experiment state (for example under the nameinitial_state.expt). Close Framsticks. Find the three files you saved on your disk and view their contents using any text editor or file viewer. Open Framsticks, and then load the experiment state file – either using menu: , or using drag-and-drop (you have to drop the experiment state file onto the title bar of the program). - Prepare the window with two plots. Go to menu: .
Select property "Genotypes: Fitness: Average Fitness", click Apply, click Add chart.
Select property "Genotypes: Fitness: Maximal Fitness", click Apply, click Add chart.
Close the window (press ESC), and show the plots window (menu: ). What do you think these plots of average and best fitness will look like over the course of evolution? Explain why you think so. - Start the simulation. Watch the gene pool window. You can sort the "velocity" column to see if the evolution is making progress. Press [F9] to hide windows and make the evolution run faster ([Shift-F4] will show the window with genotypes). [F4] restores the default layout.
- There are many parameters influencing the algorithm; see a brief reference here.
- Have a look at the charts. Compare average and maximal fitness (speed). Were your expectations correct?
- After some time when you see no improvement, in menu: change Experiment/Parameters/Selection/Delete genotypes from "Randomly" to "Only the worst" – but first determine what effects you expect from such a change. Watch the charts. What happened? After some time when you see no improvement, write down the best evolved speed value.
- Who is the winner? Is the evolved creature faster than your hand-tuned one?
- Identify what parts of the original genotype were changed by evolution, and what is the meaning of the changes.
- Let evolution adjust stick length. Set "Genetics: f1: morphology: add/remove a modifier" to 1. Set "Allowed modifiers" to
Ll. Continue with the evolution and see if the morphology changes. You can switch "Delete genotypes" between "Only the worst" and "Randomly". After some time when you see no improvement, write down the best evolved speed value. - Let the evolution add and remove neurons, receptors and muscles. Set all values in "Genetics: f1: neuron net" to 1. Continue with the evolution watching the charts. You can switch "Delete genotypes" between "Only the worst" and "Randomly". After some time when you see no improvement, compare the best evolved speed value with the two values you previously noted down.
- Try to guess what might be the results of evolution if you set the Experiment/Populations/Creatures: Neural net simulation: "Immediate". Then clear all gene pools and populations and test your hypothesis experimentally. Set all parameters appropriately, clear charts, run the evolution, and compare its outcome to previous results.
- Tall structures, designed and evolved
Goal: compare manual design and evolution in the task of building tall creatures
- Try to build a creature that is as tall as possible, yet stable, using the 'f1' genetic encoding. Do not use neurons, just the body. Save its genotype in a file, e.g. "my_tall.gen".
- Exit Framsticks and launch it again (to ensure all parameters have their default values).
- Set the simulator parameters:
- Experiment/Populations/Creatures: Death: enabled
- Experiment/Populations/Creatures: Neural net simulation: "Disabled"
- Experiment/Parameters: Gene pool capacity: 20
- Experiment/Parameters: Simulated creatures: 1
- Experiment/Parameters/Fitness: Vertical position: 1 (all other: 0)
- Add a simple X genotype.
- Start the simulation. Watch the gene pool window. You can add the "Vertical position" column (right click on genotypes list) and sort it to see if the evolution is making progress. Press [F9] to hide windows and make the evolution run faster ([Shift-F4] will show the window with genotypes). [F4] restores the default layout.
- Who is the winner? Is the evolved creature better than the one you designed?
- Try to guess what might be the results of evolution if you set the Experiment/Populations/Creatures: Neural net simulation: "Immediate". Then clear all gene pools and populations and test your hypothesis experimentally. Set all parameters appropriately, run the evolution, and compare its outcome to previous results.
- See related video.
- Two-criteria optimization
Goal: discover multi-criteria optimization and related issues
- Now you will have to evolve creatures that are both tall and simple. Look at the Experiment/Parameters/Fitness settings. You have to maximize "Vertical position" and minimize the number of "Body parts" at the same time.
- Suggest the fitness function. Think about the values of vertical position and body parts. Enter your weights for these criteria, press apply, and then check the Experiment/Gene pools/Genotypes/Fitness formula.
- What is the disadvantage of this way of computing fitness?
- What is "normalization"? Try to guess the meaning and purpose of Experiment/Parameters/Fitness/Criteria normalization.
- Perform the experiment with evolution. Is the result satisfactory? If you have problems with getting interesting results, identify the reasons and ways of overcoming this situation. Repeat the experiment again a few times or compare your result with your friends' results. Who has the best tall-and-simple creature? Consider both criteria and try to compare all the best evolved creatures.
- For a more advanced multi-criteria selection technique, turn on Experiment/Parameters/Fitness/NSGA-II and turn normalization off. Repeat the experiments and compare your NSGA-II selection results with the outcomes of previous weighted-sum selection experiments.
- Additional exercises
- 'f9' genetic encoding
- Have a look at Fig. 1 on page 3 and notice how various genetic representations are translated, and where genetic operators are applied and where evolution takes place. 'f9' genotypes are translated directly to 'f0'.
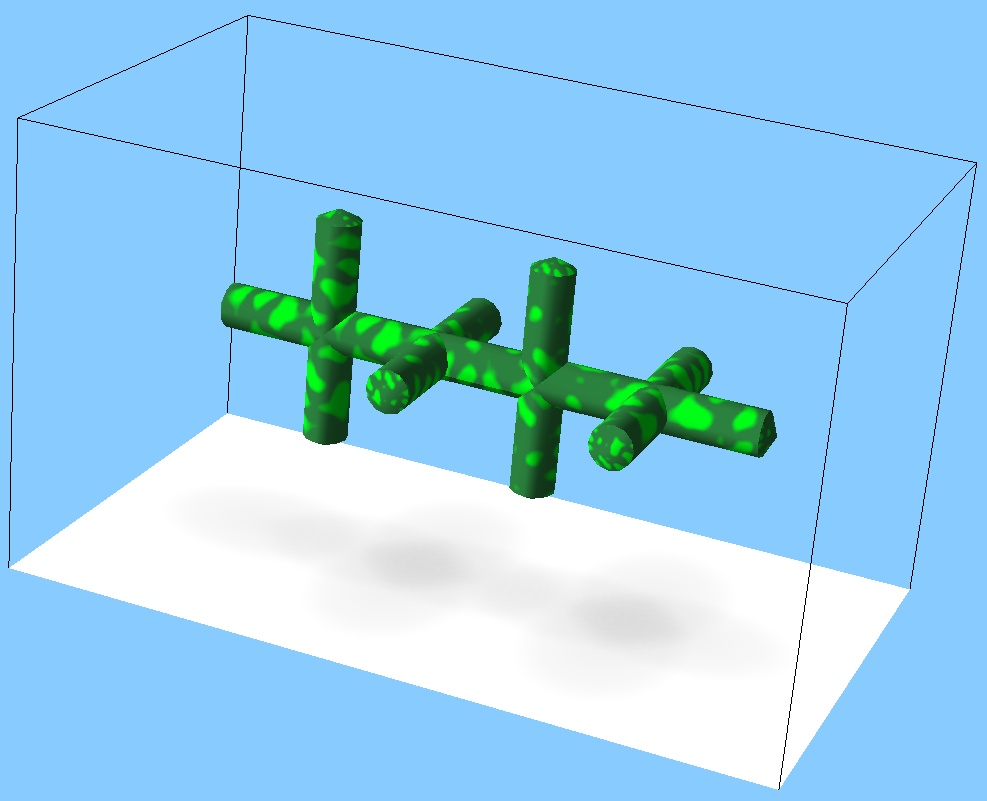
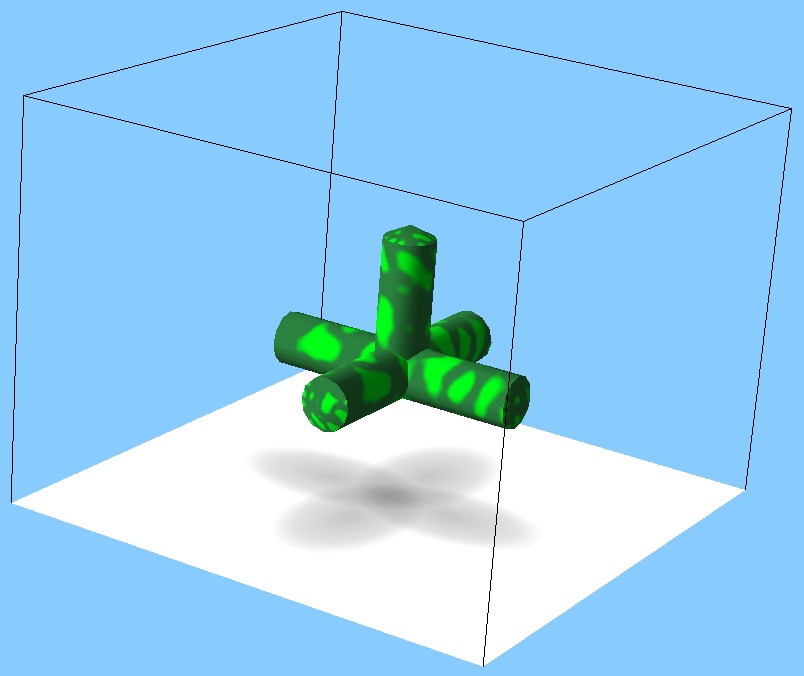
- Using letters L,R,U,D,F,B build the "plus" shape and then the "3D plus" shape. Don't forget the
/*9*/prefix.
- Check the 'f0' genotypes converted from their 'f9' analogues. Enter simple 'f9' genotypes, press "Apply" each time, and have a look at the "Conversion: f0 genotype" field.
- 'f0' and 'f0s' genetic encodings
- Read the section on the 'f0' encoding from Genetics.
- Build the following shapes: square, cube, tetrahedron, a tent. First draw these shapes on a sheet of paper and specify the 3D coordinates.
Then suggest some other simple, but interesting shape, and build it. - Build a simple neural network with three neurons connected in a line (Touch, N, Bending muscle). Change the placement (embodiment) of the Touch sensor in the body (assign it to different Parts).
- Check the 'f0' genotypes converted from their 'f1' analogues. Enter simple 'f1' genotypes (bodies and also bodies with brains), like the ones from section I.4, press "Apply" each time, and then inspect and understand the "Conversion: f0 genotype" field.
- For "relative" Joints (those using
dx, dy, dzandrx, ry, rz), it may be helpful to see 3D orientations of Parts. Trytheater -vaxes=1 -g X(X,X)andtheater -vaxes=1 -g QQXXXX(X,X). Usetheater -g -to enter multi-line 'f0' genotypes from the console or use the<redirection from a file.
- Evolution using 'f0'
- Repeat the experiments II.2 and II.3, this time using the 'f0' genetic encoding. To do it, empty the gene pool and populations, run the simulation and choose the simplest 'f0' genotype from the list of choices. First formulate your expectations as to the differences between 'f1' optimized creatures and 'f0' optimized creatures. Later verify if you were right.
- Evolution using solid shapes
- Empty the gene pool and populations, select the ODE simulation engine (in Simulation Parameters → World), then set Simulation Parameters → Experiment → Parameters → Fitness → Vertical position to
1, then run the simulation and choose the simplest 'fS' genotype from the list of choices. Press F9 to speed up evolution. Use your knowledge to adjust other parameters if needed to evolve tall structures.
- Empty the gene pool and populations, select the ODE simulation engine (in Simulation Parameters → World), then set Simulation Parameters → Experiment → Parameters → Fitness → Vertical position to
- Other experiment definitions
Goal: see how the Framsticks simulator can be controlled by experiment definition scripts
- Restart Framsticks. Set Experiment/Experiment definition to "neuroanalysis". Press "Apply". Read the Description. Close the parameters window. Load "walking.gen". Open the parameters window and press "Initialize experiment". Close the parameters window and run the simulation. Close the world window to speed up simulation. Do not touch anything until the simulation is automatically stopped. Then inspect some genotypes and have a look at their "Description" field (in the "Notes" group). Discuss how the information computed by this experiment definition can be used and what the meaning of these values is.
- Restart Framsticks. Set Experiment/Experiment definition to "reproduction". Press "Apply". Read the Description carefully. Press "Initialize experiment". Close the window and run the simulation. Open the Messages window. Watch the simulation.
- Is it possible to tell what the maximal possible number of living creatures is? (not asking here about what you see, but about the possibility based on the rules of this experiment!)
- Is it possible that all creatures die out?
- How to predict the number of creatures that will appear? (e.g., build some mathematical model of the number of apples and creatures in time?)
- Is the evolutionary improvement taking place in such a setup or not?
- What to expect after a veeeery very very very long time of simulation (millions of years on super powerful computers)? What will happen to the population and what will individuals do?
- What is the difference between this setup and the analogous evolutionary algorithm optimization experiment like those from section II ("maximize fitness = the number of apples eaten")?
- Restart Framsticks. Set Experiment/Experiment definition to "learn_food". Press "Apply". Read the Description carefully. Press "Initialize experiment". Close the window and run the simulation. Test the influence of the Experiment/Parameters/Share knowledge parameter on the system. See also Experiment/Parameters/Energy/Food placement parameter.
- Scripting
- Value types and their conversions
In the Framsticks GUI open the Console window. Enter and execute the following commands, one by one:
? 2+3
? 2.0+3
? 2+3.0
? "a"+2
? ""+2+3
? 2+"15"
? "2"+15
? Math.time
? Math.time%1000
? int(Math.time)%1000
? int(Math.time)%1000
Try to explain how the results were computed.Now first guess the result, and then check if you were right:
? 2.0*3
? 2*3.0
? 1+2.0*3.0
? 1.0+2*3
? 7+"3"+4
? 7+("3"+4)
Hexadecimal notation can be helpful:
? 0xA
? 0xff+10
? 5+int("0xf0")
? "0xf0"+5
Now meet the arrays (the last two lines are intentionally incorrect):
? ["aa",4,"5"][0]
? ["aa",4,"5"][1]
? ["aa",4,"5"][2]
? ["aa",4,"5"][Math.random(3)]
? ["aa",4,"5"][3]
? [aa,4,"5"][1]
Now some more values and their types, but introducing variables:
var a;  a=5;  Simulator.print(a);
var a;  a=5;  a=a+3.0;  Simulator.print(a);
var a;  a=5;  a+=3.0;   Simulator.print(a);
var a;  a=5;  a="abc"+a;  Simulator.print(a);
var a=5;  Simulator.print("abc"+(0.0+a));
var a=["aa",4,"5"];  Simulator.print(a[2]+8);
Types again, now using the
typeofoperator to check the type of expression at run-time:? typeof(5) ? typeof(3.0) ? typeof(5+3.0) ? typeof(3.0+5) ? typeof("some text") ? typeof("some text"+3) ? typeof(3+int("0")) ? typeof(null) ? typeof(typeof(42))Comparisons, conversions and detecting
null("empty value"):? 4==4.0 ? 4==float("4") ? 4==int(4.99) ? null==0 ? null==0.0 ? typeof(null)==typeof(0.0)A few puzzles for geeks – discover why:
? 44 < int("5")
? "44" < string(5)
? 7 & 42
? 7 | 42
? 7 && 42
? 7 || 42
? 7 && 42 && "oh"
? (7  && "abc" || 0) ? "yup" : "meh"
var dict={"a":3, "b":4};  Simulator.print(dict.hasKey(3) ? 1 : -1);
var dict={"a":3, "b":4};  Simulator.print(dict["b"]);  Simulator.print(dict->b);
Further FramScript information can be found here.
- Scripting sample
Now have a look at this piece of code. Study every line to ensure you know how it works.
World.wrldsiz = 150;                          //make the world large
GenePools[0].clear();                         //delete all genotypes in the first gene pool
Populations[0].clear();                       //delete all creatures in the first population
Simulator.import("encoding_f1_best.gen", 2);  //load genotypes from file
GenePools[0][7].genotype="X";                 //this genotype is missing in the file...
for (var i=0; i<30; i++)
{
  var geno=GenePools[0][i];                   //get i'th genotype (from 0th to 29th), and...
  var c=Populations[0].add(geno);             //construct a creature made from the genotype
  var x = 20+(i%10)*9;                        //compute target coordinates...
  var y = 30+(i/10)*20;                       //(discover how the values of x and y are computed!)
  c.locationSetBboxCenter(x, y, c.bboxCenter.z);  //...and move the center of the creature
}
If you discovered how the coordinates are computed based on the creature number (variable "i"), now ensure that the simulation is stopped, copy this piece of code, paste it into the console window, and execute it. See how the creatures are located: make the world window full screen and rotate the world.
As you can see, this piece of code automates many operations.
When writing scripts, always inspect the most recent messages in the "Messages" window. If you see any warnings or errors, "expand" them – usually you will see very useful information on where your scripts have some issues. Always ensure your scripts do not produce any warnings or errors!
- Your own fitness functions
Have a look at the Experiment/Gene pools/Genotypes/Fitness formula. This formula is automatically updated each time you change weights for the optimization criteria. However, you can create the fitness formula according to your wishes using
if (condition) action();, temporaryvariables, loops, etc. First you have to learn about the fields you can use in the fitness formula. In the Framsticks GUI, choose menu . Check the "Fitness formula" context and the "this" class, its methods and fields.Then see the "Math" class in the global context. Now is the time for your experiments. Implement the following fitness functions, and for each function, explain its meaning and verify it practically. Take care of special situations (divisions by zero, square roots of negative values, etc.).
- Number of Joints + 0.01 * number of Neurons
- Square root of velocity
- (Number of Parts + number of Neurons) divided by the number of neural connections
- Conditional fitness: if a creature has fewer than 5 Parts, then fitness is the creature's height. Else fitness is creature's height diminished by 0.1*(number of Parts minus 5).
- (advanced task) Fitness is the number of Joints divided by the volume (x*y*z) of the bounding box of the Model made from the genotype.
- Your own neuron classes
- If you are going to write larger pieces of code in FramScript, consider using Framclipse.
- Find the "scripts" subdirectory within the Framsticks installation directory. Have a look at file extensions and their contents. Then view the "threshold.neuro" file. The *.neuro files have three parts: preamble (basic neuron description), code (delimited by the ~ signs) and properties (neuron parameters). Look at the file carefully and discover how exactly the threshold neuron works. Then run Framsticks and use the genotype
to test it.X[*][Thr,-1:1,t:-0.2,hi:0.3,lo:0.8]
- Now have a look at the source of the noisy neuron (the noisy.neuro file). Can you explain how it works? Find out what genotype to use to test this neuron. Then verify if your explanation was correct.
- Discover what procedures ("methods") can be used in FramScript. In the Framsticks GUI, choose menu . Take some time to browse various classes that come to your attention. Check out the "Math" class, its methods and fields.
- Copy or save the noisy.neuro under the different name (exa.neuro) but in the same directory. Edit this file and change the neuron name by modifying the appropriate line: "name:ExA" (neuron names must start with a capital letter). Long name should be "Exercise A". Now try to modify the function go() so that the output of the neuron is the sinus function. Save the file, restart Framsticks, see the Messages window for errors. If everything is fine, create a genotype to test your ExA neuron. If your neuron code was invalid, try to correct it or ask the tutor.
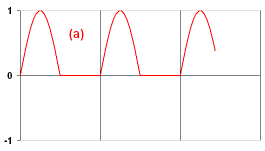 Now there comes the real exercise (a). You have to design the neuron which outputs the signal as shown on the figure. Note that your ExA neuron should have one parameter (t) to set the period of this pattern (the number of simulation steps after which the pattern repeats). Instead of restarting Framsticks each time to load your new neuron code, try clicking the Simulation Parameters/User scripts/Reload neuron definitions.
- Ensure that your neuron that solves the (a) task works properly. Then, in the following genotype replace the Sin neuron with the name of your neuron:
X[*][Sin][N,-1:1,-2:1](X,lllX[|]RRlllXlllX[|,-2:-0.5,p:1](lX,lX,,),X)Set the parameters as described in section II.1 and try to evolve this moving creature that uses the neuron you just designed! As before, only allow for mutations of neural properties and connection weights – body should not change and no new neurons should be added.
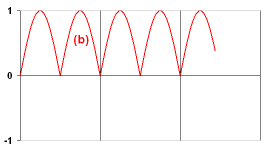
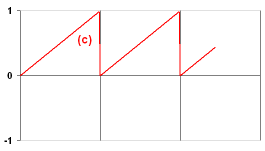
- If you were successful, solve the next three tasks. For each of them, create a separate file (exb.neuro, exc.neuro, exd.neuro). In Exercise (d), you need two parameters which specify the widths (in time steps) of the high and low output states. For some tasks, you may need to introduce the init() function to initialize some NeuroProperties. Ask the tutor if you cannot cope with some problem, or skip this problem if you cannot get help.

- There are five more challenges for you! First, build a neuron which makes the input signal smooth by averaging the current input with the two previous inputs. Use the weighted input sum, not individual inputs.
- Then build a neuron which outputs the maximum value of its inputs. Design the appropriate neural network to test it.
- Then build a neuron which multiplies the first input by the second one, and outputs the result.
- Then build a memory cell. The first input is the value to save. The second input is the control signal: if it is less than zero, then your neuron should memorize the first input value (and output it). If the control signal is zero or more, your neuron should output the memorized value regardless of the first input.
- Finally, build a neuron which outputs two values at the same time using channels. Your neuron should compute the weighted input sum and output it as an (always) positive value in the first channel, and (always) negative in the second. Later you can use the ChSel neurons to select a single channel from a multichannel output.
Note that although we designed regular neurons here, the go() function can use information about the world and other creatures, so you can easily design your own sensors. Effectors and receptors can be developed as well.
- Your own macros
- Find the "scripts" subdirectory within the Framsticks installation directory. Have a look at the contents of files with extension ".script". They are similar to the *.neuro files, right? And also have the "code:" section 😉
- Now analyze carefully and ensure you understand "neuroclsreport.script", "foodcircle.script", "creaturescircle.script" and "gallery.script". In the Framsticks GUI, find the Simulation Parameters/User scripts. You can run the scripts to see how they work.
- Remember the sample in section IV.2? It can be saved in a *.script file and executed with just one click.
- If you want to experiment and modify some .script file, first copy it with a different name. Then modify the source and restart the GUI to test your changes. Alternatively, you can test your macros by pasting their source to the console window. When you are done, implement the following macros:
- Increase the water level in the World by +0.5
- Find (using the built-in Class Browser from menu: ) the
UserScriptsobject, in this object find the name of the procedure that corresponds to the script you created, and call this procedure from the Console window:UserScripts.script_my_own(); - Arrange all living creatures (from population #0) in a square (and issue a message when there are no creatures to arrange)
- As above, but the tallest creature should stand in the middle
- Arrange them in a line, according to their height
- Print a report – display the number of objects (genotypes, creatures) in all gene pools and populations, and the names of gene pools and populations
- For each genotype, add 10 mutants to the gene pool. The original genotypes should remain unchanged, and mutants should have numbers appended to their original names
- Jiggle creatures! for all creature groups, for each living Creature, for its every MechPart, add a small random number to its velocity. It is a good idea to put the jiggling function in the experiment definition, and run it e.g. every 200 simulation steps. To achieve this, add a proper condition (call your script when the simulation
stepNumbermodulo 200 equals 0) at the end of theonStep()function in thestandard.expdeffile. - (advanced task) As above, but for all MechParts with the Touch neuron, add a small constant number to MechPart.vz
- If, for some reason, you would like to save some data in a regular file during simulation, you can use the File object. See the
scripts/neurof0html.script– there is no need to understand in detail how it works, but it illustrates how the File object can be used. You can run this script and see the file created in the scripts_output subdirectory.
- Command-line interface (CLI)
Goal: meet the Framsticks CLI and learn how to use it for automated experiments
- Download the CLI and prepare it for use.
- Run "frams". Enter "lm". Inspect the "frams.ini" file, pay attention to the init() function and learn how macros are associated with implementing functions.
- Experiment with the following macros: im, sa, st, lg, lc, qu.
- The
gomacro starts the simulation, Control-C stops it. - See that you can enter commands as in IV.1.
- Import "walking.gen", set the gene pool capacity to 20 (using FramScript:
ExpProperties.capacity=20;), set the number of simultaneously simulated creatures to 2 (ExpProperties.MaxCreated=2;), run the simulation until 1000 creatures are evaluated (using FramScriptwhileloop, for inspiration see how thegomacro is defined), while the evaluation takes place watch simulation speed (this is displayed in the window title), then export genotypes to "walk2.gen" (read the documentation forSimulator.export), and save simulator state to "walk2.expt" using thesamacro. - Have a quick look at the contents of the "walk2.expt" file using any text editor.
- Load "walk2.expt" in GUI (you can drag a file and drop it onto the title bar of the application), start the simulation, press F9 and compare simulation speed (displayed in the right top corner) with the speed you experienced in CLI.
- Create a "cmds.txt" file with the commands you issued in the recent exercise, quit frams, and use it in batch mode. Run the Windows (or Linux) command-line interpreter (cmd.exe or sh), and enter:
frams < cmds.txt
- Learn how to use parameters in the command line – enter
frams --help
and then, for example,frams "? 2+3" "lo walking.gen" "lg" "qu"
- Make neuroanalysis.expdef evaluate all genotypes from walking.gen, and then save the resulting gene pool ("sa walk-analyzed.gen"). If you use an experiment definition other than standard.expdef, you have to set it as an argument in command-line like this:
frams "expdef neuroanalysis". Don't forget about initializing the experiment. - Create a "cmds-neu.txt" file with the commands you issued in the recent exercise, quit frams, and use it in batch mode.
- For a mature working and useful example of a shell script (*.cmd) and a macro (*.script) that run a complete parametrized experiment, see evolve-speed-vs-gravity. You can modify this example to suit your needs.
- For a more advanced usage of CLI, see Section V of this tutorial.
- Customizing standard experiment definition
If you want to evaluate some kind of a complex lifetime behavior that cannot be expressed as an aggregation of pre-computed performance indicators (like velocity, life span, or vertical position), you can use Creature's
datadictionary to store any information you need. This field is versatile and can store any object, including Vectors and Dictionaries. You can modify values in thedatadictionary in each simulation step depending on where the creature is, what it does and how it behaves.If you want such evaluation to be used as fitness, you have to propagate it from Creature to Genotype. Find the following line in standard.expdef: "Want to copy customized values from Creature data fields to Genotype data fields?" and assign the fitness component (that you computed and stored in Creature's
datadictionary) to some key in thedatadictionary of the Genotype (g). Then, in the fitness formula (which is defined for genotypes), you can usethis.data->myfieldany way you need.The "Custom fields dictionary" of a Genotype and a Creature can be displayed in Framsticks GUI, which is helpful for debugging.
Example.
Copy
data/scripts/standard.expdeftodata/scripts/standard-MY.expdef. Editstandard-MY.expdef. At the end of thefunction onBorn(cr), add the following two lines:cr.data->maxheight = -999; cr.data->height_history = []; //just for demonstration
Save the file. Run Framsticks GUI and activate the "standard-MY" experiment definition. Add one "X" genotype. Simulate it. Double click the living creature in the Populations list and see "Custom fields dictionary" in the "Current performance" category.
Back to editing. At the end of the
function onStep(), add the following lines:for(var cr in Populations[0]) //all creatures in population #0 if (cr.perf_measuring == 1) //this creature is in the "performance measurement activated" period { var height = cr.bboxLow.z - cr.bboxGroundOffset; //or cr.getMechPart(0)... cr.data->maxheight = Math.max(cr.data->maxheight, height); if (cr.steps_in_lifespan % 10 == 0) //record height in history from every 10-th time step cr.data->height_history.add(height); }Save the file. In GUI, go to Parameters, click "Reload experiment definition" button and close the window. Add one "X" genotype. Simulate it a few hundred steps until its Energy starts to decrease. Double click the living creature in the Populations list and see "Custom fields dictionary" in the "Current performance" category.
Back to editing. Find the text "Want to copy customized values from Creature data" and add there the following lines of code:
	Simulator.print("Height history of '" + cr.name + "' : " + cr.data->height_history); //just for demonstration
	if (g.data.hasKey("maxheight")) //update "cumulative" average
		g.data->maxheight = (float(g.data->maxheight) * g.instances + cr.data->maxheight) / (g.instances + 1);
	else
		g.data->maxheight = cr.data->maxheight;
Save the file. In GUI, go to Parameters, click "Reload experiment definition" button and close the window. Add one "X" genotype. Open the "Messages" window. Run the simulation until the creature dies. Double click any genotype in the Gene pools list and see "Custom fields dictionary" in the "Performance" category.
See also the contents of the
data/messages.outfile. This is the same as the "Messages" window!Finally, set the "Fitness formula" of the "Genotypes" gene pool to
return this.data.hasKey("maxheight") ? this.data->maxheight : -999;In simulation parameters → World, set "Type" to "Height field" and "Map" to a 4x4 height matrix: "M 4 4 1.0 1.2 1.4 1.6 0.5 0.7 0.9 1.1 0.0 0.3 0.5 0.7 -0.4 -0.2 0.2 0.4".
Now you can perform evolutionary optimization according to fitness which is... what you defined above!
- Your own experiment definition
See the scripts/*.expdef files, choose some simple expdef, discover what "onSomething" events are implemented, save the expdef with a different file name, modify it, restart the GUI, and test your modifications. Have a look at simple
learn_food.expdefandgenerational.expdef. If you successfully completed previous tasks, you are now able to implement your own definitions of experiments. Some ideas for experiment definitions to create:- Compute Genotype's distance as a difference between the place of birth and the place of death.
- Compute fitness as the height of the topmost Part, averaged during the life span (measured in onUpdate events).
- Cleaning: when two creatures collide outside of the world center, move the bigger one to the world center. If this place is already occupied (use
creature.boundingBoxCollisions(0)to detect a collision with another object), the creature is moved higher. - Fight for resources (arena): creatures are born on two sides of a spot and the one which is able to cover most of the spot gets higher fitness.
- Pursuit and evasion: two gene pools, two contradictory fitness functions, one group of creatures is evolved to escape, the other one – to follow them.
- Your own Framsticks Theater show
See the scripts/*.show files, choose some simple show, discover what "onSomething" events are implemented, save the show with a different file name, modify it, restart the theater application, and test your modifications.
- Your own OpenGL style
Have a look at the 3dobj/*.style files. Proceed similarly as described above. Read the tutorial on scripting, it includes a related example. See also the Spooksticks story.
- Interaction with other environments; Python
- Run Framsticks CLI as an independent process, analyze results, repeat.
- Typical usage scenarios were discussed in IV.6.
- To read and write Framsticks files in Python (in particular, genotypes), use the "framsfiles" module from https://www.framsticks.com/svn/framsticks/framspy/
- Customize the "ini" file if needed –
frams.iniandcliutils.iniserve as examples. - Framsticks CLI as server(s); client(s) in your favorite language(s).
- SDK for software developers.
Goal: make the creatures talk to each other
The creatures we built in previous exercises can already sense the environment in one simple way: looking for energy sources. Now it's time for a more dynamic interaction: use specialized neurons to send and receive signals between creatures.
Goal: learn FramScript and understand its importance and potential
See more scripting resources including the full reference for contexts, classes and methods.
If you want to interact directly with the simulator from Python, see the sample code in https://www.framsticks.com/svn/framsticks/framspy/. In particular, see frams-test.py for direct interaction, FramsticksLib.py for basic buildinig blocks for evolution (mutation, crossover, evaluation), and FramsticksEvolution.py together with run-deap-examples.cmd for evolutionary algorithms in Python.
This way you can not only perform evolution, but even design and use your own genetic representation implemented entirely in Python, and have easy access to a multitude of non-standard evolutionary architectures. Additionally, the "evolalg" subdirectory contains a custom module for evolutionary algorithms with variants (supports constraints on complexity, multicriteria optimization, niching, novelty search, quality-diversity, etc.).
For command-line usage, try frams -? to learn about available command-line switches.
| Communication language | |||
FramScript-iframs.ini |
Client-server protocol-inet.ini |
||
| Communication channel |
stdin, stdout | frams |
frams -inet.ini |
Network TCP sockets-n or -N |
frams -n -iframs.ini |
frams -n |
|