
|
See also: Interface parameters, Simulator parameters
Bottom: Mini-tutorial, GUI command-line usage
Introduction
Click on the "Window" menu. Notice that there are seven windows to show/hide. By default, five of them are already open: Groups, Artificial world, Body & Brain, and two lists: genotypes and individuals. Genotypes and individuals (or, generally, simulated objects) can be grouped into Gene pools and Populations, respectively.
You can revive individuals by selecting their genotypes (upper list) and pressing the "Simulate" button. The selected genotypes are then "grown" and placed in the artificial world. Selecting them on the "Populations" list makes the camera follow the selected creatures (display rate is adjustable in the listbox in the top right corner of the world window).
Use the menu to start and stop the simulation. You can also invoke some functions using the toolbar on the top, or using keyboard shortcuts.
You can kill or delete living creatures using buttons. Killing means that the program treats the creature as if its energy had reached zero (so it is like a "natural" death). Deleting means just removing it from the simulation.
The "Update" listbox (in the "Populations" window) sets the frequency for refreshing information about genotypes, creatures, etc. When you double-click a genotype on the list, the genotype data window will be opened:
Genotype data window
You can see/edit properties of genotypes. While editing the genotype, you can interactively see the changes (instant body and brain preview), as long as the genotype is valid. Selecting a genotype fragment highlights parts of the morphology and brain which are created by the fragment. It also works the other way: you can select body or brain parts to see what genes are responsible for creating these parts (these genes are underlined). Hold down the Shift key while selecting parts of the body and brain to add new parts to the selection, or to toggle them.
You can give any name to your creature ('Name' field). If you leave it blank, the name will be generated automatically.
Body and brain window
In the body panel, left click selects parts of the body or neurons/receptors/effectors. Hold down Shift to add more parts to the selection. Right mouse drag rotates the structure. The mouse wheel zooms.
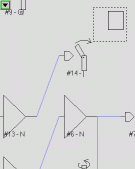 In the brain panel, left click selects parts of the brain: neurons, receptors, and effectors. Hold down Shift to add more parts to the selection. The mouse wheel zooms. You can move neurons by dragging them while you hold the Shift key down. Press the Alt key and drag the mouse horizontally to zoom the neural diagram (as shown in the right picture). When zoomed, you can drag the diagram to pan it.
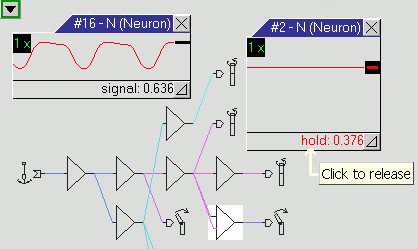 When the neural network shown belongs to a living creature, double-clicking on a neuron makes a signal window pop up. You can not only see signal flow in neurons, but also adjust excitation levels and thus control the brain of a living creature (as shown in the left picture). Also, neural connections are displayed in various colors reflecting the signal level. Click on the scale indicator (the green "1x") and drag the mouse horizontally to scale the chart.
Helpful hints are displayed when you hover the mouse pointer over an object.
Artificial world window
In this window, left-dragging the mouse rotates the world. Right-dragging pans the view, and scrolling the mouse wheel zooms. Double-clicking on a simulated object will focus the camera on that object (although this will not be reflected by a selection of that object on the populations list).
Press Shift + right-click to invoke an action from the action list. Right double-click will invoke the first action from the list without displaying it.
Press Control + left-click to grab some object with a robot arm and move it by dragging the mouse. Release the left mouse button first to drop the object. Release the Control key first if you want the robot arm to keep grasping the object.
More hints
Be sure to explore the menus which appear when you click on a small arrow in the top left corner of windows. Also, right-click on genotypes and individuals which are listed in gene pools and populations to see many options.
Messages produced by the program can be viewed in the "Messages" window.
A GUI mini-tutorial
- Launch the Framsticks application.
- Load genotypes from walking.gen (Menu:File->Load genotypes from...)
- Load parameters from manual.sim (Menu:File->Load simulator parameters from...)
- Select 'Basic Quadruped' on the Genotypes (upper) list.
- Click the Simulate button and choose the "Creatures" population.
- Select 'Basic Quadruped' on the Individuals (lower) list.
- Start simulation (Menu:Simulation->Run).
- You can watch as the creature moves, play with it, grab it with the mouse (control + left mouse button), move the camera (left or right drag on the world window), zoom (mouse wheel), etc.
- Double-click on the 'Basic Quadruped' in the upper window to examine its data.
- Want to try out your own creature? Look at the 'genotype' section, and try to modify it or create a new one. Then you can place it in the simulator world.
If you would like to start evolution now, you should change a few parameters:
- Turn on 'death' (creatures will be removed when they run out of energy).
- Set the number of creatures to be automatically placed in the world.
- Set the selection criterion.
Finally, enter the starting genotype in the genotypes list. This can be the simple 'bacteria' (a single X), or you may wish to improve any other genotype through evolution.
Command-line parameters for the Framsticks GUI
Framsticks.exe [-go | -demo] [-help] [file.sim] [file.gen] [...]
Framsticks.exe  ev11_11.gen  ev11_12.gen


Framsticks.exe  water.sim  ev.gen   -go


Framsticks.exe  -demo  demo-chase.sim  demo-chase.gen


Framsticks.exe  manual.sim
The first example loads two genotype files.
The second example loads a water environment and a genotype file, and starts evolution.
The third example loads an environment and genotypes, and runs the demo mode (80% displaying time, 20% pure simulation).
The fourth example loads a simulator settings file.
Advanced notes
- Simulator settings files may contain partial information (only a subset of parameters). This can be very useful when defining various environments and performing batch processing.
- You can drag *.gen, *.sim, and *.expt files and drop them on the Framsticks.exe file in order to launch Framsticks and load the dragged files. You can also double-click files with such extensions to launch Framsticks and load the clicked file. Or you can drop them onto the title bar of the running app.